
Learn how to use Nginx as a Reverse Proxy - Part 01
Nginx is a high-performance, open-source web server software renowned for its speed, reliability, and scalability. Originally developed to address the scalability issues of the Apache web server, Nginx has gained widespread popularity for its efficiency in serving static content, handling high traffic loads, and acting as a reverse proxy server.
Imagine you're hosting a grand gathering, and numerous guests are arriving at your residence. Some seek to indulge in games in the backyard, others aim to engage in conversations in the living room, and a few desire to dance in the garage. Chaos would ensue if all attempted to enter through the front door simultaneously!
Enter Nginx. It acts as a savvy host, directing each guest seamlessly to their desired destination without any confusion.
Consider having a website comprising distinct sections: a blog, an online store, and a forum. Each segment resides on a separate computer in your abode (or server, in technical terms). Instead of having visitors knock on the front door and then wander throughout the house to locate their interests, Nginx positions itself at the entrance, inquiring, "What brings you here?"
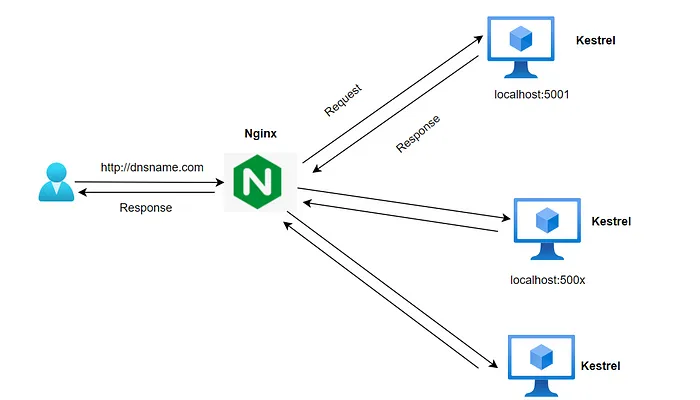
Yet, Nginx isn't limited to assisting one person at a time; it excels at managing numerous visitors concurrently. It adeptly handles hundreds, thousands, even millions of individuals accessing your website, ensuring each finds their way without any hassle.
Moreover, Nginx contributes to maintaining the security and integrity of your website. It adeptly shields your digital residence from unwelcome intruders while ensuring seamless operations behind the scenes.
Setting up NGINX on Ubuntu and Configuring Firewall with UFW
To install NGINX on Ubuntu, open your terminal and execute the following command:
sudo apt-get install nginx
Configuring Firewall with UFW: After installing NGINX, you need to configure the firewall to allow incoming traffic on ports 80 (HTTP) and 443 (HTTPS). We'll use UFW, a user-friendly interface for managing iptables firewall rules.
sudo ufw allow ssh
First, allow SSH to ensure you don't get locked out of your server:
sudo ufw allow ssh
Next, allow HTTP and HTTPS traffic by enabling the 'Nginx Full' profile, which opens both port 80 and port 443:
sudo ufw allow 'Nginx Full'
Finally, enable UFW to apply the configured rules:
sudo ufw enable
